
What is a turkey injection marinade and how is it used?
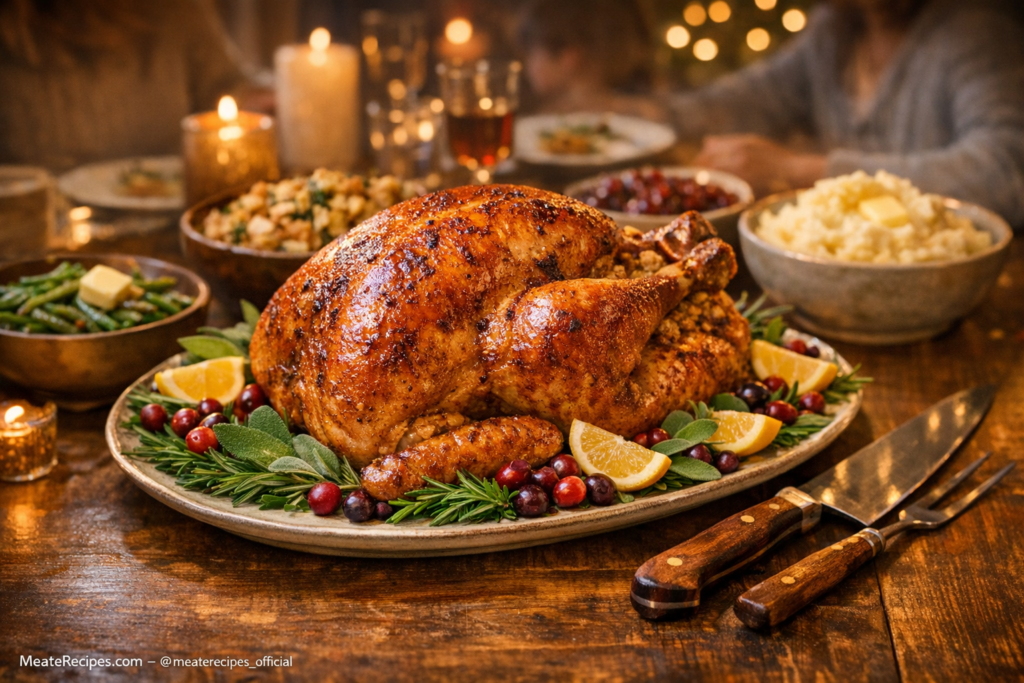
You set the holiday table, bring out a gorgeous golden turkey, slice into the breast… and your heart sinks. The meat looks dry, stringy, and nothing like what you pictured in your head. Everyone is polite, but you know the centerpiece of the meal just missed the mark.
If you’ve been there, you’re not alone. Large birds are tricky, and even careful roasting can still leave you with dry white meat. That’s exactly where a homemade turkey injection changes everything. Instead of hoping the outside seasoning will magically soak in, you send moisture and flavor straight into the meat itself.
In this guide, you’ll learn how to make a homemade turkey injection step‑by‑step, how to use it safely, and how to build different flavor profiles so your turkey comes out moist, tender, and deeply seasoned from edge to center.
Table of Contents
What Is a Homemade Turkey Injection (and Why Use It)?
What Is a Turkey Injection?
A turkey injection is a liquid mixture—usually broth, butter or oil, herbs, spices, and sometimes juice—that you inject directly into the meat with a meat injector. Instead of staying on the surface like a rub or only affecting the outer layers like a brine, the injection travels into the muscle fibers.
That gives you two big advantages:
- You add moisture where the turkey dries out most, especially the breast.
- You build flavor inside the meat, not just on the skin.
Why a Homemade Turkey Injection Works So Well
Turkeys, especially whole birds, lose a lot of water as they cook. The breast is lean and cooks faster than the legs, so it dries out first. Even if you baste or cover the pan, you’re still mostly protecting the outside.
When you use a homemade turkey injection:
- You push liquid into the thickest parts of the bird, giving them a head start on moisture.
- You carry salt, herbs, and aromatics deep into the meat, so every slice tastes seasoned.
- You get a “safety net” against overcooking by a few minutes, because there is more moisture to lose before the meat feels dry.
You can inject a turkey you plan to roast, smoke, or even deep‑fry—the technique works across all cooking methods.
What You Need for a Homemade Turkey Injection
Before you start injecting, you need a solid base recipe and the right tools to work cleanly and safely.
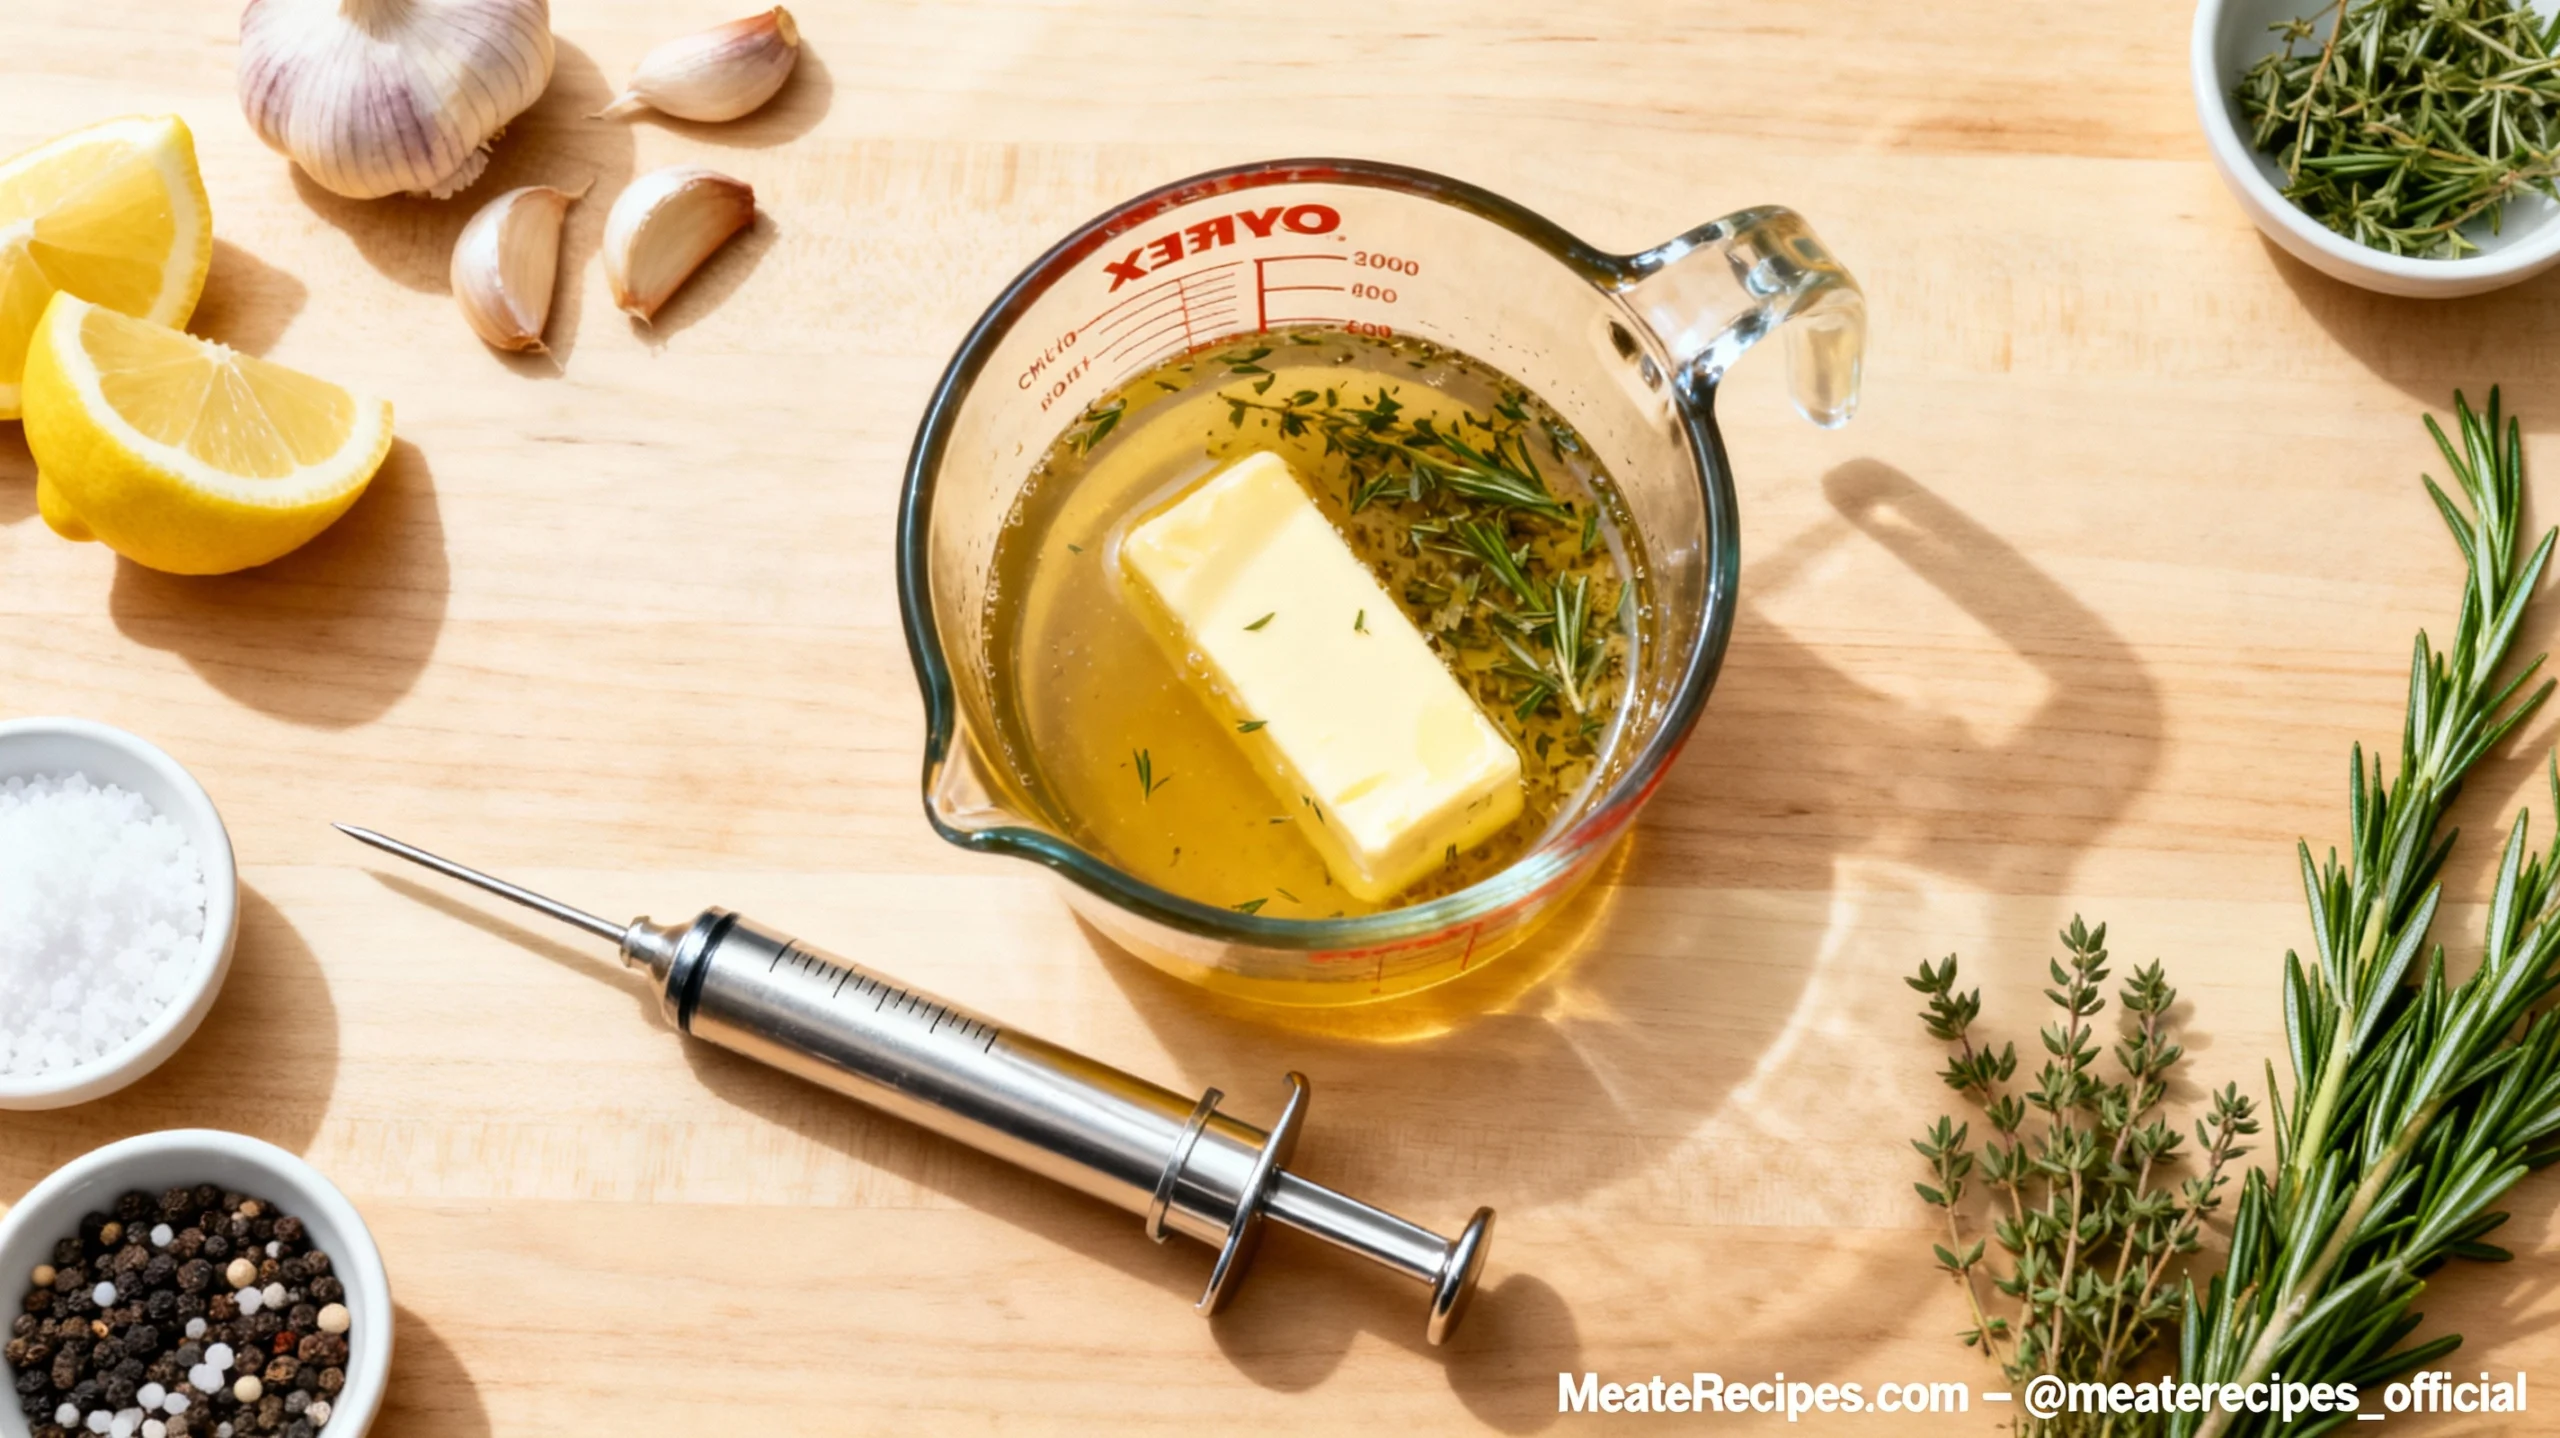
Core Ingredients for a Moist, Flavorful Injection
Here’s a reliable base homemade turkey injection you can adjust to your taste:
H4: Base Homemade Turkey Injection Recipe
| Ingredient | Amount | Purpose |
|---|---|---|
| Chicken or turkey broth | 1 cup | Moisture + savory base |
| Apple juice | 1/2 cup | Gentle sweetness + extra moisture |
| Melted butter | 1/4 cup | Richness, mouthfeel, helps browning |
| Garlic, minced | 2–3 cloves | Aromatic depth |
| Fresh rosemary, chopped | 1 tbsp | Classic herb flavor |
| Fresh thyme, chopped | 1 tbsp | Earthy, savory notes |
| Salt | 1 tsp | Boosts and balances flavors |
| Black pepper | 1/2 tsp | Mild warmth |
Optional add‑ins you can use to customize your homemade turkey injection:
- Honey or maple syrup for extra sweetness.
- Soy sauce for more umami and depth.
- Lemon or orange juice for a bright, citrusy edge.
- Smoked paprika or cayenne if you like subtle heat or smokiness.
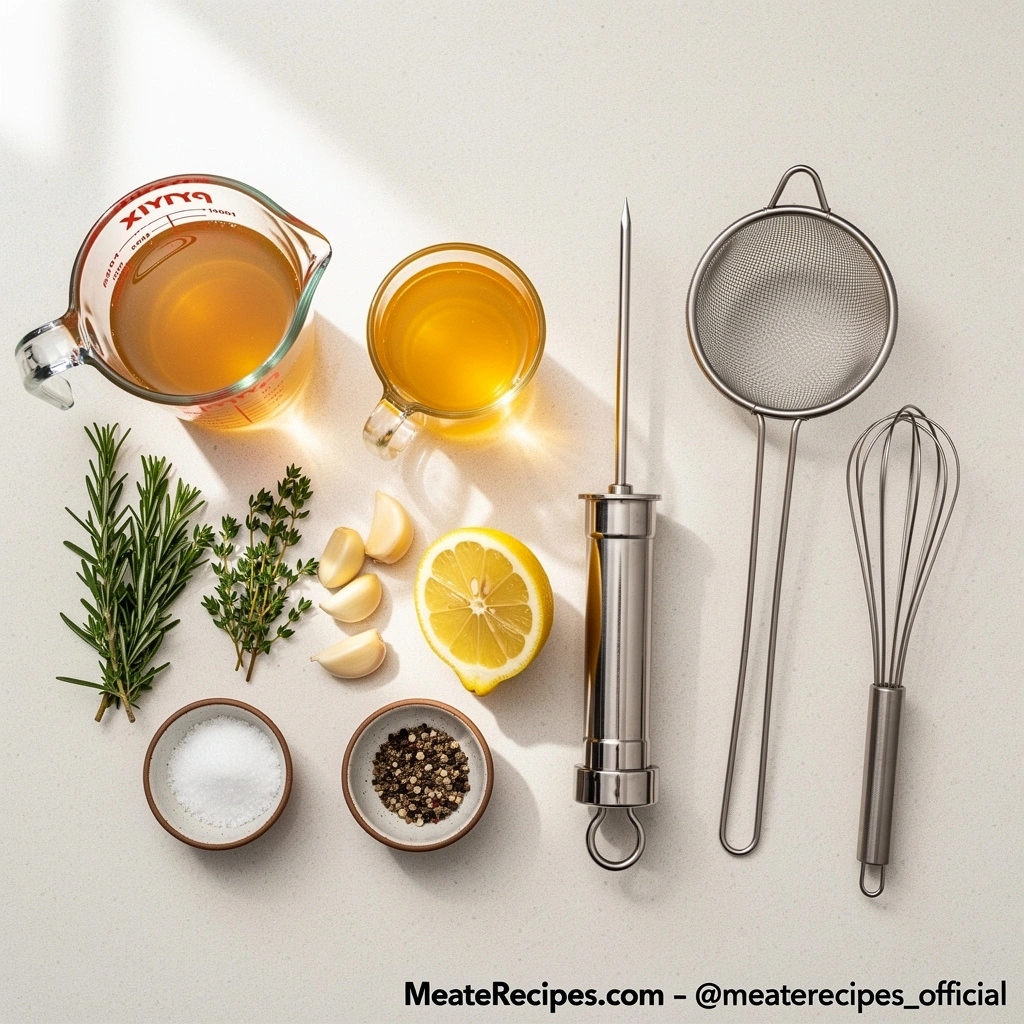
Tools and Equipment You’ll Need
You don’t need a professional kitchen, but a few simple tools make the process a lot easier:
- Meat injector / flavor injector with a long needle.
- Mixing bowl and whisk to blend the injection smoothly.
- Fine mesh strainer to catch herb and onion bits that might clog the needle.
- Measuring cups and spoons for consistent results.
- Paper towels to pat the turkey dry.
- Cutting board for prep.
From a safety standpoint, you should always:
- Wash and sanitize the injector before and after use.
- Clean any surfaces and utensils that touch raw turkey.
Step‑by‑Step: How to Make a Homemade Turkey Injection
Step 1 – Mix the Injection Solution
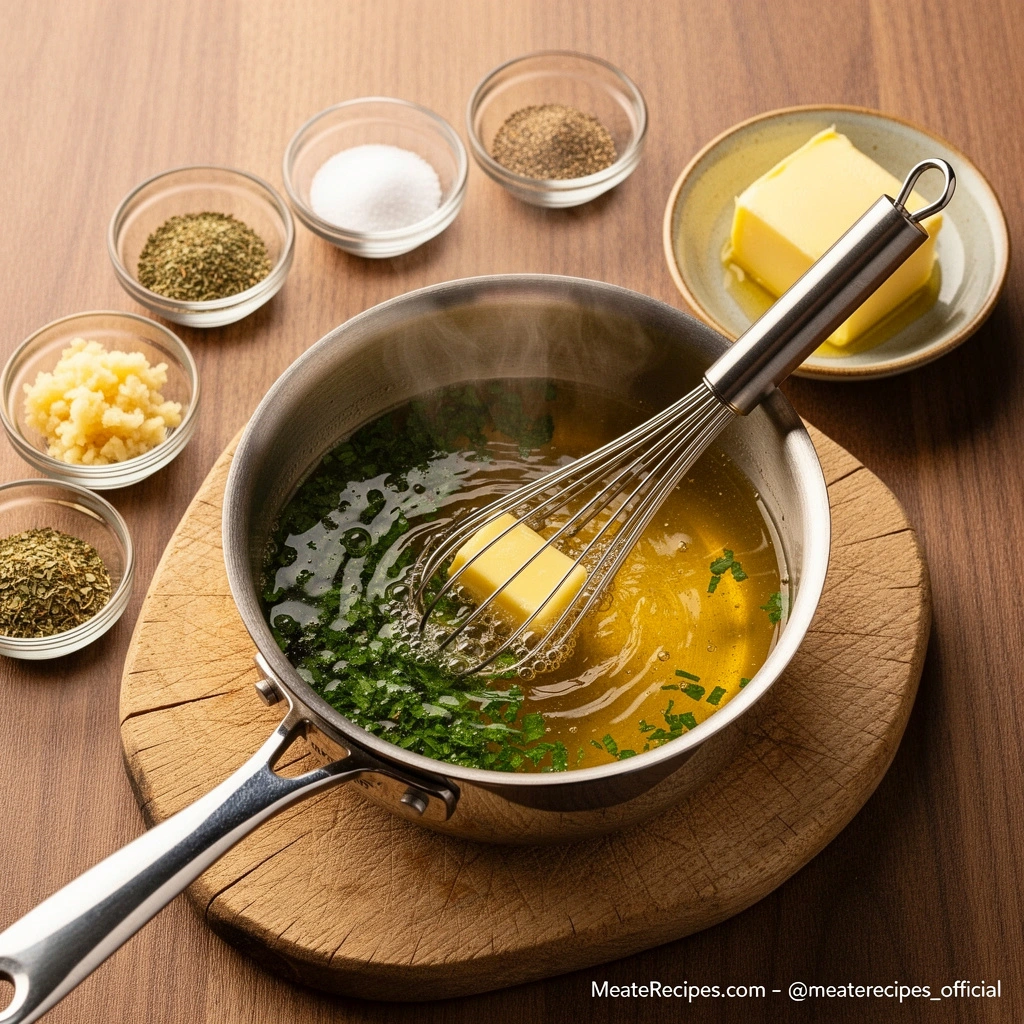
Start by building your flavor base:
- Gently melt the butter—you want it liquid, not browned.
- In a mixing bowl, whisk together the broth, apple juice, melted butter, minced garlic, herbs, salt, and pepper.
- Let the mixture sit for about 10–15 minutes so the flavors come together.
- Pour the mixture through a fine mesh strainer into a clean bowl or measuring cup to remove any solids that could block the injector.
- Let it cool slightly until it’s warm but not hot; that keeps the butter liquid while avoiding any partial cooking of the meat when you inject.
Step 2 – Prepare the Turkey

How you prep the bird has a direct impact on how well your homemade turkey injection works:
- Thaw the turkey in the fridge only; leaving it out on the counter is not considered safe.
- Remove giblets and neck, then pat the turkey very dry with paper towels, especially the skin.
- Identify the thickest parts of the breast, thighs, and drumsticks—these are your main injection zones.
- You can gently loosen the skin with your fingers so you inject into the meat without piercing the skin itself.
A dry surface gives you better skin crisping later, and clear target zones help you inject evenly.
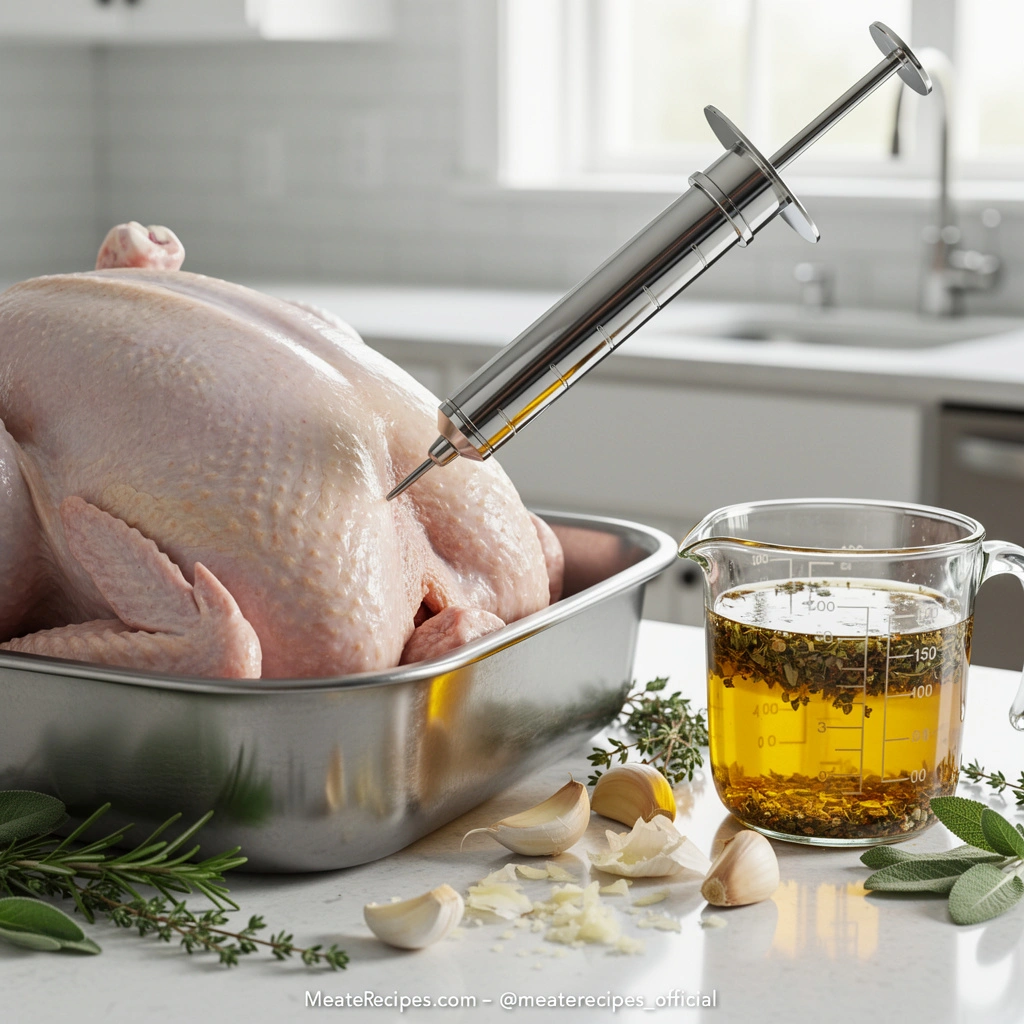
Step 3 – Inject the Turkey Evenly
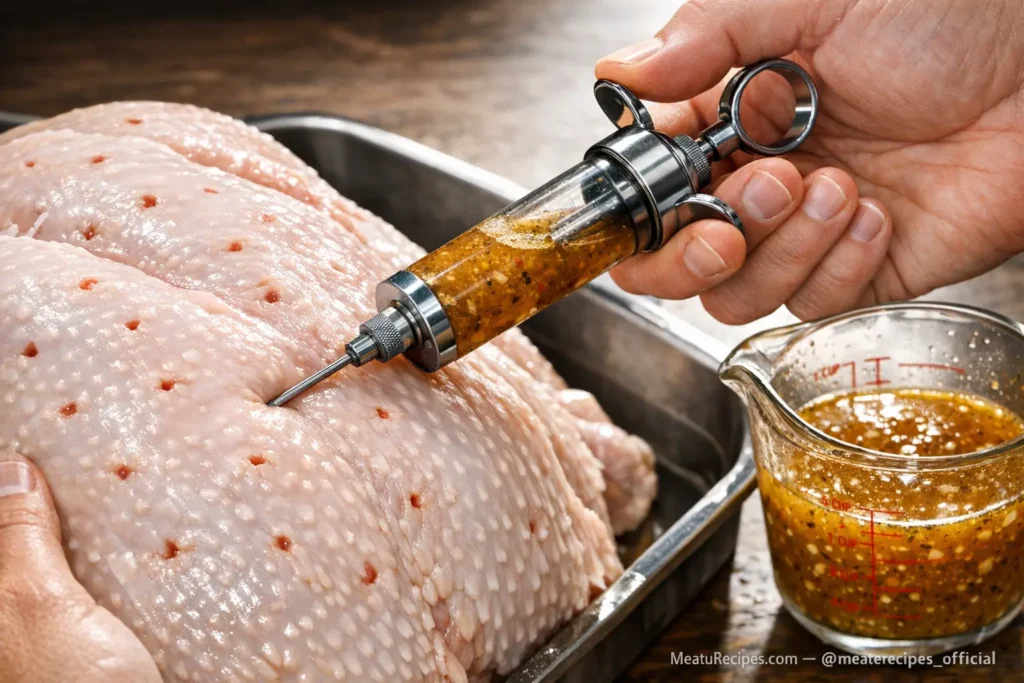
Now you use your homemade turkey injection exactly where it matters most:
- Fill the injector with your injection solution.
- Insert the needle into the thickest part of the breast at a slight angle, aiming into the center of the meat.
- Slowly press the plunger while you pull the needle back a little. This spreads the liquid through the meat instead of leaving it in one pocket.
- Repeat injections every 2–3 cm (about 1 inch) across both breasts, then into thighs and drumsticks.
- For a 12–14 lb turkey, plan to use about 1–1.5 cups of injection total. If you’re working with a larger bird, you can increase slightly, staying close to roughly 1/2 cup of injection for every 5 pounds of turkey.
- If you see liquid spurting out of the skin, you’re either injecting too close to the surface or pushing too much into one spot; just ease back the volume per injection site.
Step 4 – Rest, Season, and Roast
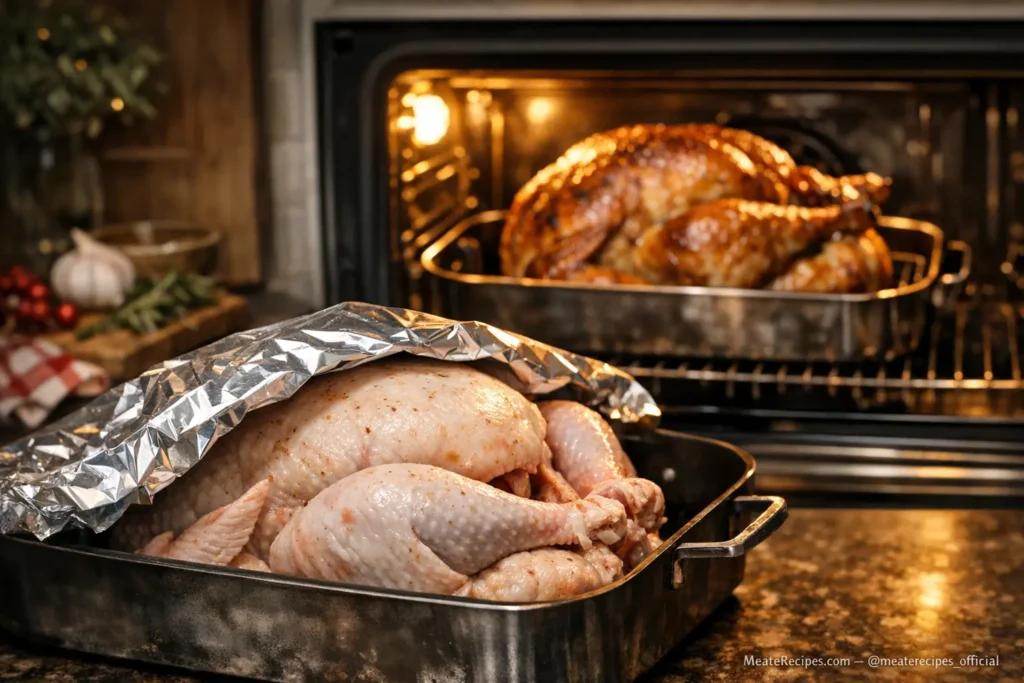
Once you’ve injected the turkey, a little patience pays off:
- Place the turkey in a roasting pan or on a tray and refrigerate it for 30–120 minutes to let the injection distribute inside the meat.
- Pat the skin dry again, then apply your favorite dry rub or herb butter on the outside.
- Roast at a moderate oven temperature—325°F (165°C) is common—using a rack so heat circulates well.
- Use a meat thermometer to check doneness. You want an internal temperature of 165°F (74°C) in the thickest part of the breast and thigh.
- If the skin is browning faster than you’d like, tent the turkey loosely with foil and keep cooking until it reaches temperature.
- Give the turkey 20–30 minutes to sit before you slice it so the juices have time to move back through the meat.
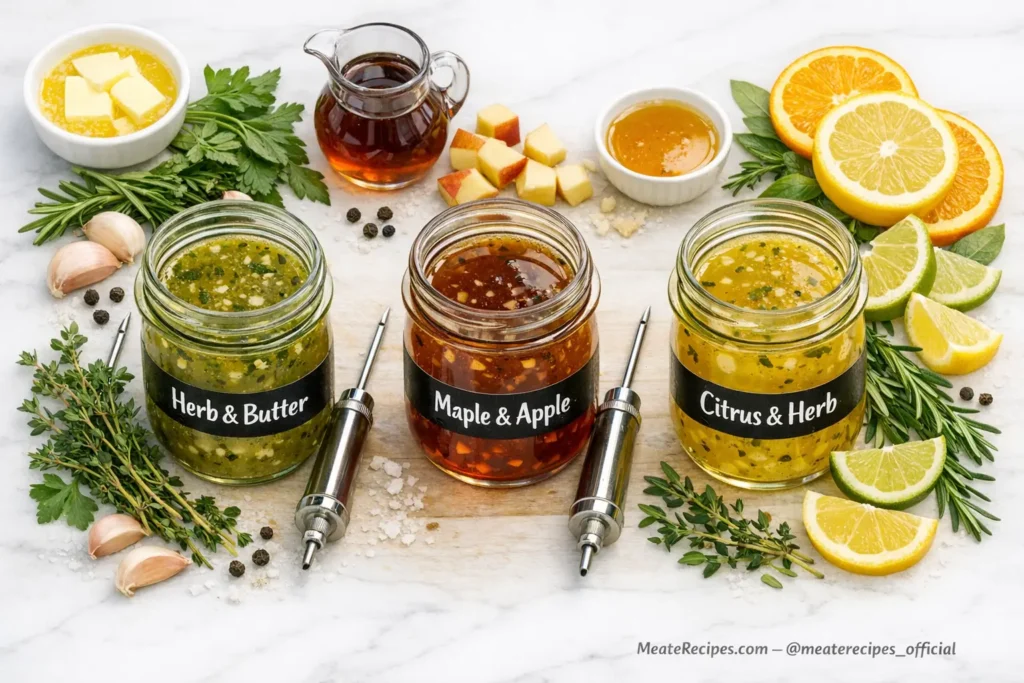
Three Homemade Turkey Injection Recipes You Can Try
Once you’re comfortable with the process, you can change flavors without changing the technique.
Classic Herb & Butter Homemade Turkey Injection
This is your “safe bet” holiday profile—savory, buttery, and familiar.
H4: Classic Herb & Butter Injection
| Ingredient | Amount |
|---|---|
| Chicken broth | 1 cup |
| Melted butter | 1/4 cup |
| Garlic powder | 1 tsp |
| Onion powder | 1 tsp |
| Fresh rosemary | 1 tbsp |
| Fresh thyme | 1 tbsp |
| Salt & pepper | To taste |
This homemade turkey injection works especially well if you also tuck herb butter under the skin.
Sweet Maple & Apple Homemade Turkey Injection
If you like a gentle sweetness that complements the savory notes, this one is for you.
H4: Maple & Apple Injection
| Ingredient | Amount |
|---|---|
| Turkey or chicken broth | 1/2 cup |
| Apple juice | 3/4 cup |
| Pure maple syrup | 3 tbsp |
| Soy sauce | 1 tbsp |
| Melted butter | 2 tbsp |
| Cinnamon (optional) | 1/4 tsp |
| Salt & pepper | To taste |
This homemade turkey injection pairs well with roasted apples, sweet potatoes, and fall side dishes.
Citrus & Herb Homemade Turkey Injection
Bright, fresh, and a bit lighter, this option suits you if you prefer a zesty bird.
H4: Citrus & Herb Injection
| Ingredient | Amount |
|---|---|
| Vegetable or chicken broth | 1 cup |
| Orange juice | 1/2 cup |
| Olive oil | 2 tbsp |
| Lemon juice | 2 tbsp |
| Fresh sage | 1 tbsp |
| Fresh oregano | 1 tsp |
| Garlic, minced | 2 cloves |
| Salt & pepper | To taste |
Serve this citrus‑injected turkey with green salads, roasted vegetables, or lighter sides.
Pro Tips for Safe and Effective Homemade Turkey Injection
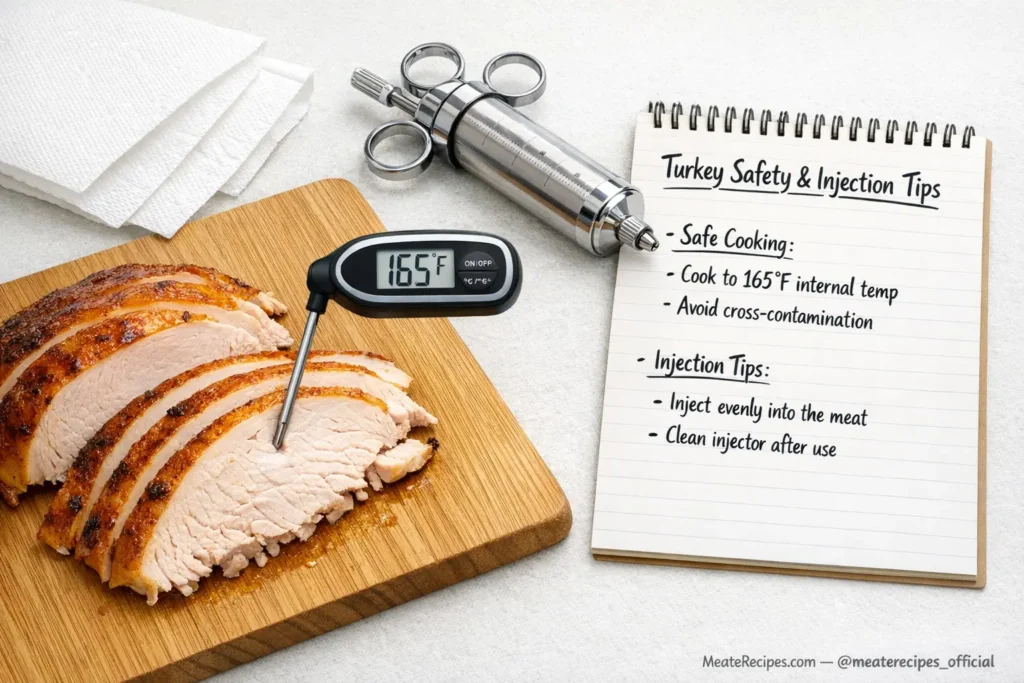
Food Safety Essentials
Any time you work with poultry, a few habits protect you and your guests:
- Thaw the turkey in the refrigerator, not on the counter.
- Wash your hands, injector, bowls, and cutting boards with hot, soapy water after they touch raw turkey.
- Discard any leftover injection liquid that has been in contact with the injector after it’s been inserted into the meat.
- Always rely on a meat thermometer to confirm doneness; color alone is not reliable.
Avoid These Common Injection Mistakes
Even simple techniques can go wrong if you rush. Try to avoid:
- Over‑injecting: too much liquid in one place creates soggy pockets that leak out.
- Ignoring the legs and thighs: these areas benefit from moisture just as much as the breast.
- Skipping the strainer: unstrained herbs and onions can clog the injector.
- Injecting very hot liquid: a hot injection can start cooking the meat unevenly where you inject it.
Combine Injection with Other Moisture‑Boosting Methods
A homemade turkey injection doesn’t have to be your only trick:
- Use a light dry brine on the outside, then a low‑salt injection inside.
- Work herb butter under the skin while the injection seasons the meat beneath.
- Make gravy from the pan drippings to echo the flavors in your injection and keep slices extra moist on the plate.
Serving, Leftovers, and Reheating
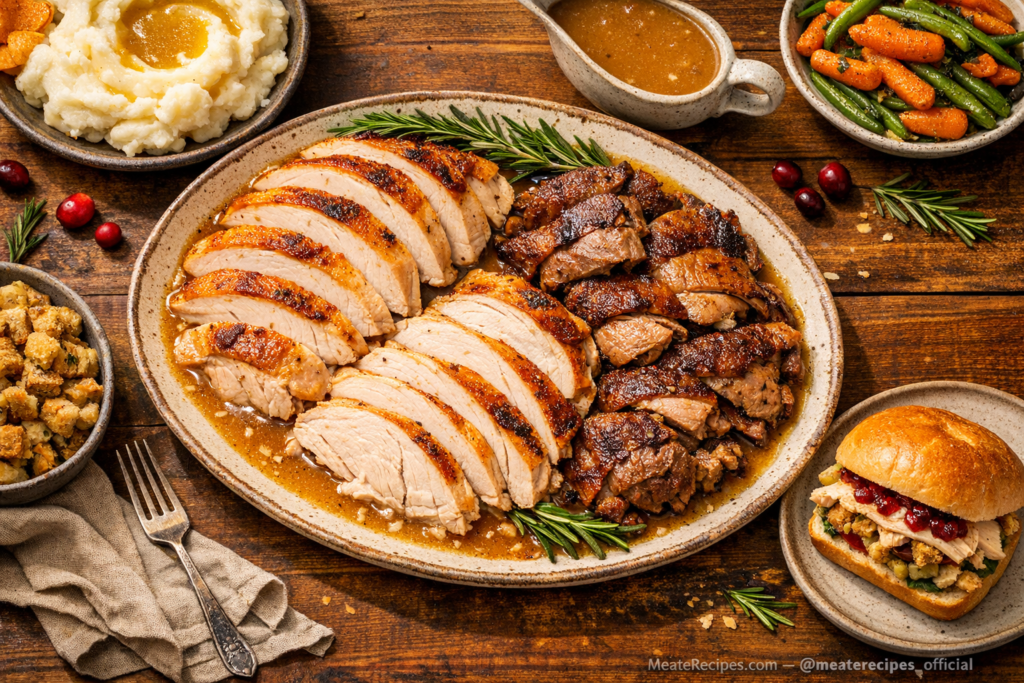
Serving a Moist Injected Turkey
When it’s time to bring the turkey to the table:
- Carve the breast across the grain into even slices so the texture stays tender.
- Arrange slices on a warm platter and spoon a little pan juice or gravy over the top to showcase the moisture you worked so hard to keep.
Storing and Reheating Without Losing Juiciness
To keep your work paying off for days:
- Store carved turkey in shallow airtight containers with a bit of pan juice or broth.
- Reheat gently—either covered in the oven at a low temperature or in the microwave with a splash of liquid and a cover.
- Avoid blasting leftovers with high heat; slow, gentle reheating keeps the meat from drying out again.
FAQ: Homemade Turkey Injection for Moist Turkey

What is a homemade turkey injection, exactly?
A homemade turkey injection is a seasoned liquid—usually made with broth, fat, herbs, and spices—that you inject into the meat before cooking. It’s designed to keep your turkey moist and to carry flavor deep into the meat, not just on the skin.
How much homemade turkey injection should I use per pound?
A good rule of thumb is about 1/2 cup of injection for every 5 pounds of turkey. For a typical 12–14 lb bird, 1–1.5 cups of homemade turkey injection is usually enough when you spread it evenly through the breasts and legs.
Do I still need to brine if I use a homemade turkey injection?
You don’t have to. A homemade turkey injection can replace brining for many people. If you do both, lower the salt in one or the other so you don’t end up with an overly salty turkey.
Can I make the injection ahead of time?
Yes. You can mix your homemade turkey injection up to a day in advance and keep it in the fridge. Warm it gently before you fill the injector so any butter in the mixture is liquid and easy to work with.
Will injecting the turkey change the cooking time?
Not in any significant way. The bird may feel slightly heavier with added liquid, but you should still roast based on weight and always check doneness with a thermometer rather than the clock.
What if I don’t have a meat injector?
You can poke deep holes with a skewer or chopstick and pour some of the mixture over the turkey, but it won’t be as effective. For the full benefit of a homemade turkey injection, a proper meat injector is a small investment that pays off every holiday.
Turn This Holiday’s Turkey into a Win
You don’t need a culinary degree or a restaurant‑grade kitchen to serve a turkey that’s moist, flavorful, and worth remembering. With a simple homemade turkey injection, you give yourself a powerful tool: more moisture where it matters and flavor that runs through every slice.
Pick one of the injection recipes, gather your tools, and try this method on your next holiday bird. Once you taste the difference, you’ll wonder how you ever roasted turkey without it. And if it helps you rescue just one more holiday meal from dryness, it’s already done its job.
Conclusion – Make Dry Holiday Turkey a Thing of the Past
When you use a homemade turkey injection, you’re not just adding one more step to your prep—you’re solving the biggest problem that ruins most holiday birds: dry, bland meat. Instead of hoping the seasoning on the outside will carry the whole dish, you send moisture and flavor straight into the places that need it most, especially the breast.
Now you know how to mix a simple injection, how to inject the turkey evenly, how to stay safe, and how to switch up the flavors with herb, maple, or citrus‑based recipes. The next time you roast a turkey, you can move with a lot more confidence, knowing you’ve stacked the odds in favor of a juicy, tender result that actually tastes as good as it looks.
All that’s left is for you to try it. Pick one homemade turkey injection recipe from this guide, grab a meat injector, and test it on your next Thanksgiving or Sunday roast. After you taste the difference, you’ll understand why once people start injecting their turkey, they rarely go back to roasting it plain.
If you want to go even deeper into flavor ideas, check out my detailed turkey injection marinade guide here: Turkey Injection Marinade.