

How to cook crispy chicken cutlets in the oven step-by-step
When you picture comfort food, a perfectly crispy chicken cutlet probably comes to mind: golden on the outside, juicy on the inside, and simple enough for a busy weeknight. Oven-baked chicken cutlets give you that same crunch you love from fried versions, but with less mess, less oil, and a lot more convenience in your own kitchen.
If you have ever pulled a pan of pale, soggy chicken from the oven and wondered what went wrong, this guide is for you. Here, you will walk through every step you need to get reliably crispy chicken cutlets in the oven, from choosing and preparing the meat to breading, baking, and serving them in creative ways.
Table of Contents
What Is a Chicken Cutlet and Why Bake It?
Understanding Chicken Cutlets
A chicken cutlet is simply a boneless piece of chicken breast that has been sliced and pounded until thin and even, usually around 1/4–1/2 inch thick. This thin shape helps your chicken cook quickly and evenly, so you get a tender interior without drying it out.
Because the surface area is larger, chicken cutlets are ideal for coating with flour and breadcrumbs, giving you a big payoff in texture with every bite. The cutlet shape also makes portioning easy, so you can serve one or two pieces per person depending on appetite.
Why Choose Oven-Baked Over Fried?
When you bake your chicken cutlet instead of deep-frying, you cut down on excess oil while still creating a crispy exterior if you use the right technique. With panko breadcrumbs, a bit of oil, and proper oven heat, you can mimic the texture of pan-fried or deep-fried chicken without standing over a hot pan.
Baking is also cleaner and more predictable: you set a timer, let the oven work, and your kitchen will not smell strongly of hot oil for hours afterward. This makes oven-baked chicken cutlets a smart option for regular weeknight meals, meal prep, or feeding a crowd.
Key Ingredients for Crispy Oven-Baked Chicken Cutlet
What You Need for the Best Results
To get that ideal crunch, you need a simple set of ingredients that work together: thin chicken, a three-step breading system, and a small amount of fat to help browning. At the center of the recipe are chicken cutlets, plus flour, eggs, panko breadcrumbs, grated Parmesan, and a few pantry spices.
You can tweak the flavors by changing the herbs or adding spices like smoked paprika or chili flakes, but the basic components stay the same. Once you know this foundation, you can confidently adjust the recipe to match your own taste or whatever you have in your pantry.
Chicken Cutlet Ingredient Table
Chicken Cutlet Ingredients Table
You can also keep lemon wedges on hand for serving, or stir a bit of lemon zest into the egg wash if you want a brighter, fresher flavor in your chicken cutlet.
Essential Tools and Oven Setup
Tools That Make a Difference
With a few basic tools, your chicken cutlet will bake more evenly and come out crisp instead of soggy. A large baking sheet is essential, and if you have a metal wire rack that fits on top of it, you can elevate the cutlets and let hot air move around them.
A simple instant-read thermometer is another helpful tool, letting you check the internal temperature of the thickest piece of chicken quickly. This prevents overbaking, which is one of the main reasons a chicken cutlet turns dry rather than juicy.
Setting Up Your Oven
Before you start breading, preheat your oven to 400°F (about 200°C) so that it is hot when the chicken goes in. If the oven is not fully preheated, the coating can absorb moisture and oil instead of crisping from the start.
Position your oven rack in the middle or upper-middle area; this position usually delivers the best balance of even cooking and attractive browning on the top surface of the cutlets. If your oven has convection, you can use it for slightly faster and more even crisping, but regular bake also works well.
Step-by-Step: How to Cook Crispy Chicken Cutlet in the Oven
Step 1 – Trim, Slice, and Pound the Chicken
Start by trimming any excess fat from your chicken breasts, then slice each breast horizontally to create two thinner pieces. Place each piece between two sheets of parchment or plastic wrap and gently pound it with a meat mallet or rolling pin until the thickness is even all over.
This step might seem extra, but it keeps your chicken cutlet from cooking unevenly, where the thinner area dries out before the thicker part reaches a safe temperature. When every piece is about 1/4–1/2 inch thick, you set yourself up for reliably juicy, evenly baked chicken.
Step 2 – Season the Chicken
Before you touch the flour or breadcrumbs, season both sides of each cutlet with salt and black pepper. This base seasoning ensures that flavor reaches the meat itself, not just the outer coating.
If you like, you can add a light sprinkle of garlic powder or dried herbs directly on the chicken as well, although most of your additional flavor will come from the breadcrumb mixture. The goal here is to ensure that every bite tastes seasoned, not bland under the crust.
Step 3 – Set Up Your Breading Station
Prepare three shallow dishes and arrange them in a row. In the first dish, add the flour and a pinch of salt and pepper. In the second, beat the eggs until smooth, optionally adding a touch of lemon juice or zest for brightness. In the third, mix the panko, Parmesan, garlic powder, onion powder, herbs, salt, and pepper.
Lining up these dishes from flour to egg to breadcrumbs lets you work smoothly without confusion. As you coat each chicken cutlet, you will move from left to right, and your hands will naturally fall into a rhythm that makes the process fast and consistent.
Step 4 – Bread the Chicken Cutlets
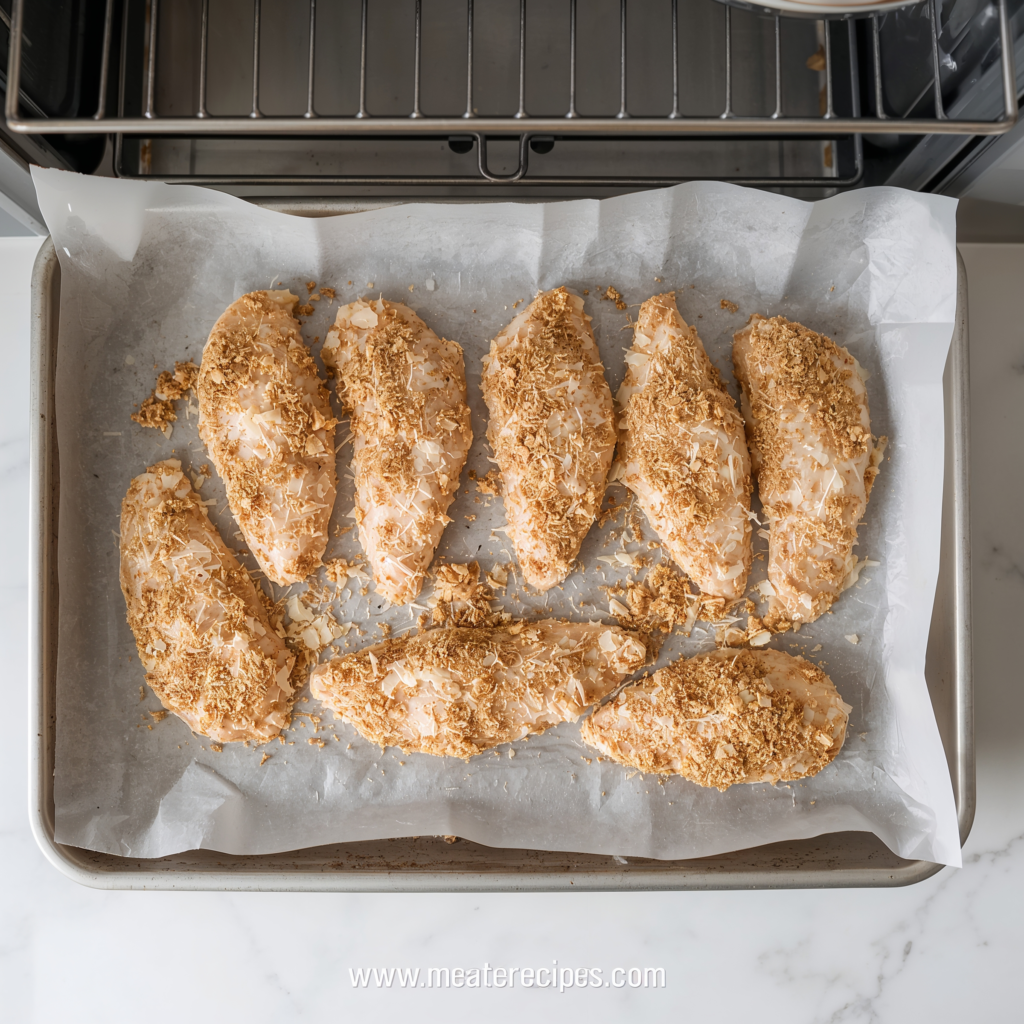
Take one cutlet at a time and press it into the seasoned flour, coating both sides and shaking off the excess. Move it into the beaten egg, turning until it is fully covered and any bare flour spots disappear. Finally, lay it in the panko mixture and press down firmly, then flip and repeat to build a thick, even layer of crumbs.
Once coated, transfer the chicken cutlet to your prepared baking sheet or wire rack. Give each piece a little space so the sides are not touching; this small gap helps hot air circulate and keeps the edges from steaming. Repeat with the remaining pieces until all your cutlets are breaded.
Step 5 – Add Oil for Extra Crunch
Before you slide the pan into the oven, drizzle each chicken cutlet lightly with olive oil or spray generously with cooking spray. The oil helps the breadcrumbs turn golden and crisp instead of staying pale and dry.
If you plan to flip the cutlets halfway through baking, keep the oil handy. After you turn them over, you can mist or brush the other side lightly to encourage even browning and crunch on both faces.
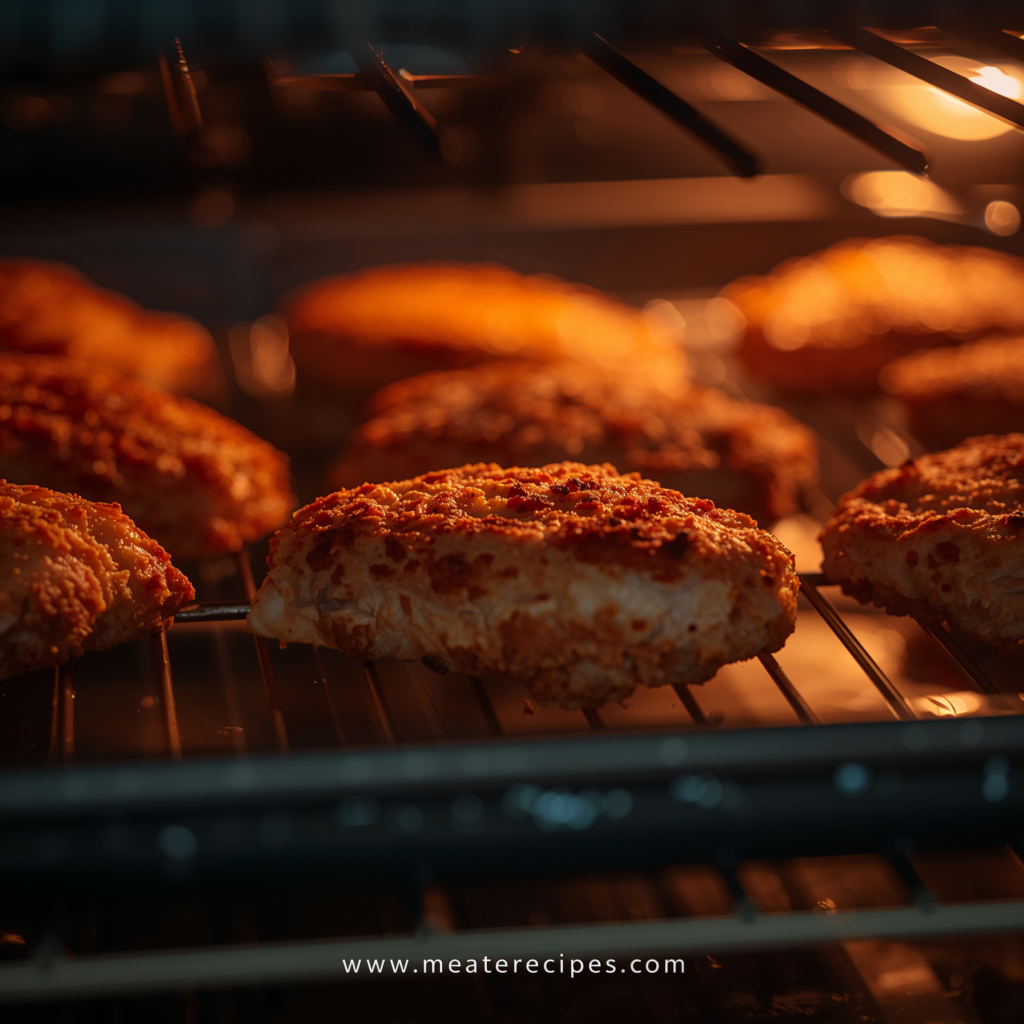
Step 6 – Bake to the Right Temperature
Slide the tray into your preheated oven and bake the chicken cutlets at 400°F (200°C). Depending on the thickness of the cutlets and your oven, they will typically need around 15–20 minutes to cook through and crisp up.
Around the 15-minute mark, check the internal temperature of the thickest cutlet with your thermometer. Once it reaches 165°F (74°C), your chicken is safe to eat and should be moist inside with a crunchy exterior. If it has not reached that number yet, continue baking and check again after a few minutes.
Step 7 – Let the Chicken Rest and Serve
When the chicken cutlet is fully cooked, remove the pan from the oven and let the cutlets rest on the rack for about 5 minutes. This short rest helps the juices settle back into the meat, so the chicken stays tender when you cut into it.
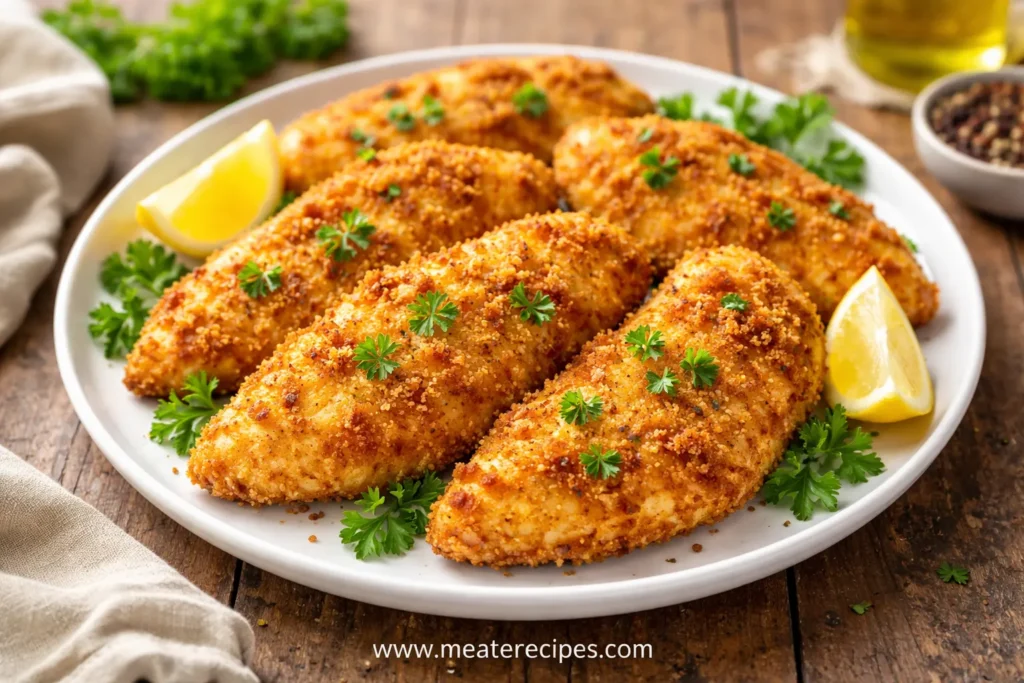
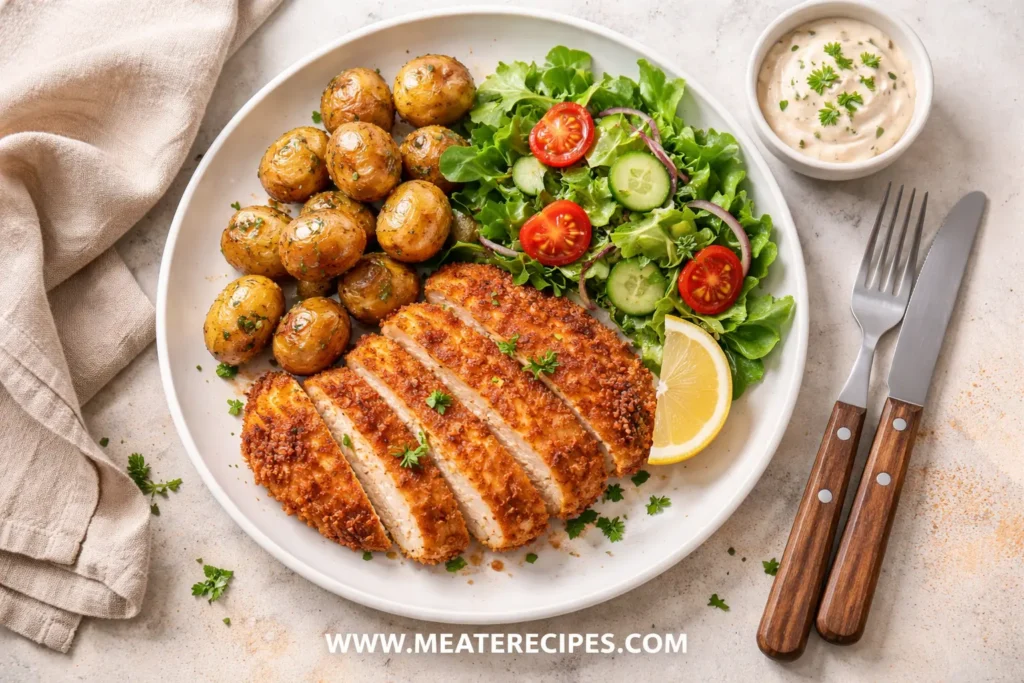
Serve your crispy chicken cutlet with lemon wedges, a simple salad, roasted vegetables, or your favorite side dish. You can also tuck it into a sandwich, slice it over pasta, or lay it on top of a grain bowl to build a balanced meal.
Pro Tips for Extra Crispy Chicken Cutlet in the Oven
Boosting Crunch Without Frying
If maximum crunch is your goal, panko breadcrumbs are one of your best tools; their larger, airy flakes brown beautifully in the oven and stay crisp longer than fine, traditional breadcrumbs. Mixing Parmesan into the panko adds extra flavor and helps create a more textured, golden crust.
Using a wire rack over your baking sheet keeps the underside of the chicken cutlet from sitting in its own moisture and helps both sides crisp more evenly. This simple change in setup can make a clear difference in how crunchy your final result feels.
Playing With Flavors
Once you master the core method, you can customize your chicken cutlet to match different cuisines and preferences. For a Mediterranean feel, use dried oregano, thyme, and a touch of lemon zest in your crumb mix, then serve the cutlets with a bright salad or yogurt-based sauce.
For an Italian-style version, lean into Italian seasoning and extra Parmesan and serve your crispy chicken cutlet with marinara, mozzarella, and pasta or garlic bread. If you or your guests avoid gluten, you can simply swap regular panko for gluten-free panko or gluten-free breadcrumbs and follow the same steps.
Common Mistakes You Should Avoid
When Chicken Cutlet Isn’t Crispy
One frequent problem is skipping the pat-dry step at the beginning; excess surface moisture on the chicken makes it harder for flour and crumbs to cling and can cause patches where the coating falls off. Another problem is crowding the pan so much that the cutlets steam rather than crisp.
If you notice that your chicken comes out pale or soft, try spacing the pieces further apart, using a wire rack, and ensuring the oven is fully preheated. A light but thorough coat of oil or spray on top of the breading also plays a key role in achieving a truly crispy finish.
Avoiding Dry, Tough Chicken
Overcooking is the main reason your chicken cutlet feels dry, even when the coating looks perfect. If you leave the cutlets in the oven for long after they reach 165°F (74°C), the meat loses moisture and the crust can become hard rather than pleasantly crisp.
Using evenly thin cutlets and checking with a thermometer gives you better control, so you can pull the pan at the right moment. Letting the chicken rest briefly after baking further protects the juiciness you worked to preserve.
Serving Ideas and Meal Prep Tips
How to Serve Your Crispy Chicken Cutlet
Your crispy chicken cutlet can be the highlight of many types of meals, not only a classic “meat and potatoes” plate. You can pair it with roasted potatoes and steamed vegetables, serve it over a fresh green salad, or add it to a Caesar-style salad for a restaurant-style dish at home.
For something more substantial, tuck the cutlet into a sandwich with lettuce, tomato, pickles, and your favorite sauce, or layer it into a toasted roll with melty cheese for a satisfying chicken cutlet sandwich. Changing the sides and sauces lets you use the same basic recipe in new ways all week.

Storing and Reheating Without Losing Crunch
If you have leftovers, let the chicken cool completely, then store it in an airtight container in the fridge for up to about three days. When you are ready to eat, reheat the chicken cutlet in the oven or an air fryer instead of the microwave so the coating gets crisp again.
For longer storage, you can freeze cooked or uncooked breaded cutlets on a baking sheet, then transfer them to a freezer bag once solid. Bake from frozen, adding extra time as needed, until the coating is hot and crisp and the internal temperature returns to 165°F (74°C).
FAQ – Chicken Cutlet in the Oven
How long should you bake chicken cutlet in the oven?
For thin chicken cutlets, baking at 400°F (200°C) for around 15–20 minutes usually gives you a crispy crust and fully cooked center. The exact time depends on thickness and your oven, so use visual cues and a thermometer to confirm doneness.
What internal temperature is safe for chicken cutlet?
You should always cook chicken cutlet to an internal temperature of 165°F (74°C) measured at the thickest part of the meat. Hitting this temperature ensures food safety while still allowing the chicken to stay moist if you do not bake it far beyond that point.
How do you keep chicken cutlet crispy after baking?
To maintain crispiness, cool the cutlets briefly on a wire rack instead of covering them tightly, which traps steam and softens the crust. When reheating, use a hot oven or air fryer rather than a microwave, which tends to make breaded foods rubbery.
Can you make a gluten-free crispy chicken cutlet in the oven?
Yes, you can easily make a gluten-free version by using gluten-free panko or gluten-free breadcrumbs in place of regular crumbs. The breading technique and oven method stay the same, so you still get that crunchy texture.
Can you use chicken thighs instead of breasts for cutlets?
You can use boneless, skinless chicken thighs for a richer flavor, as long as you trim them and pound them thin in the same way. Thigh meat may need a little longer in the oven, but you should still aim for 165°F (74°C) at the center.
Make Crispy Chicken Cutlet Part of Your Routine
Once you follow this process a few times, cooking crispy chicken cutlet in the oven becomes a reliable habit you can lean on whenever you need a quick, satisfying meal. You know how to prep the chicken, build a flavorful crust, set up your baking tools, and avoid the usual pitfalls like soggy breading or dry meat.
Now it is your turn to put this into action: choose a night this week, gather your ingredients, and bake a batch of crispy chicken cutlets using these steps. Try one basic version first, then experiment with different herbs, spices, and side dishes—and share your results with friends or on social media to inspire someone else to master their own oven-baked chicken cutlet.
Conclusion – Make Crispy Chicken Cutlet Part of Your Routine
When you follow this step-by-step method, cooking crispy chicken cutlet in the oven stops feeling like a gamble and becomes a skill you can rely on any night of the week. You know how to choose and prep thin cutlets, build a flavorful crunchy coating, set up your pan and oven correctly, and avoid the common pitfalls that lead to dry or soggy chicken.
From here, your kitchen turns into a small test lab where you can play with herbs, spices, sides, and sauces to create your own signature crispy chicken cutlet combinations. Pick one evening this week, gather your ingredients, and bake a batch—then share your favorite version with friends, family, or your online community and invite them to try your recipe too.